

ok this is a DIY for a TIP install on a 1.8T motor.
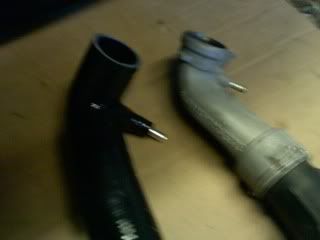
here's a quick side by side pic
![Image]()
![Image]()
Here's list of tools needed:
* Floor Jack and Jack stands
* Sometime to put behind the rear wheel so the vehicle will not move
* Safety googles are highly recommended
* Flat Head screwdriver (long and short length)
* Phillips screwdriver (long and short length)
* 8mm allen wrench
* 5mm allen wrench
* pliers
* 3/8 and 1/4 drive ratchets with extensions
* 10mm socket
* 13mm socket
* 16mm socket
* WD-40 or dishwashing soap
* Hose clamps
* Proper work lighting
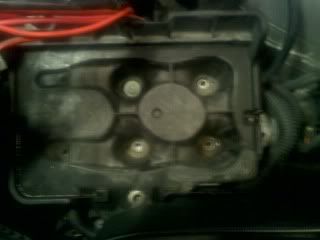
First i would start with removing the engine cover. Then unhook your battery terminal, just unhook both because the battery will have to completely come out for easy installation. Then you'll need to remove the surrounding plastic pieces around the battery. Before you can remove the battery, there's a small metal bracket held in place with a 13mm bolt, in between the battery and headlight housing. Here's a pic of what it should look like afterwards.
![Image]()
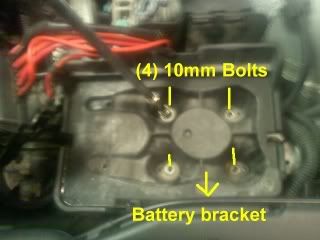
Here's a pic of the (4) 10mm bolts holding the battery tray in place, these need to be removed for the tray to come out.
![Image]()
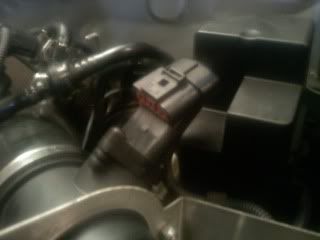
After the battery and it's housing are removed, begin to remove the stock air filter and the MAF housing. Now i have a SRI, so I just had to remove my hose clamp to take the air filter off. If you have the factory airbox, youll need to remove that. Next I removed the actual MAF sensor. You need to unhook the sensor out of the housing first tho.
![Image]()
![Image]()
**This is a pic with the new TIP installed on to the MAF housing
Then i removed the nuts holding my SRI heatshield into place. Now I just removed the hose clamp on the other side of the MAF housing, so when i removed the SRI heatshield the MAF housing could stay into it. *Note i have my plastic screens removed from my MAF housing. You should have a honeycomb like plastic on both sides of your MAF housing.
![Image]()
Now with the all of that outta the way u can begin to remove the vacuum lines and other things off of the factory TIP.
First the factory clamps used are a 1-Time use clamp, best to go buy need hose clamps from an autoparts store or whatever. I used a flathead screwdriver and pliers to remove the factory clamps. You'll need atleast (5) hose clamps in different sizes, i just took the new TIP to the hardware store and matched it with the right sizes.
![Image]()
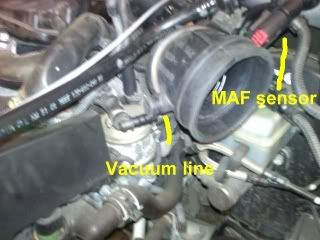
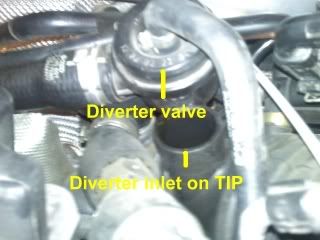
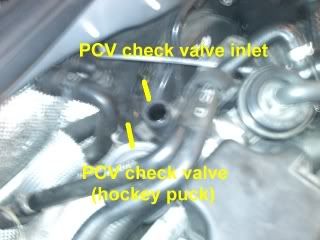
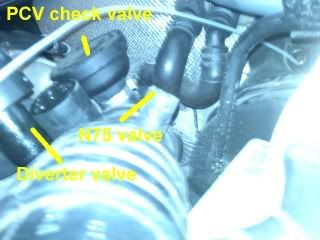
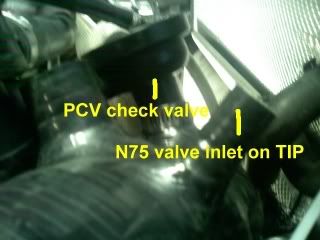
The first vacuum line i removed is the smaller one. Then i removed the factory DV from the top of the TIP. Behind that is the PCV check valve or hockey puck, remove that. The last line to remove on the top of the stock TIP is the N75 valve.
![Image]()
![Image]()
![Image]()
![Image]()
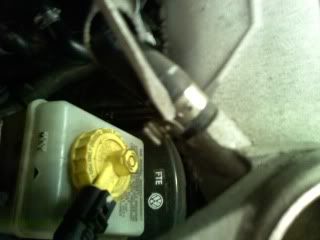
There is a 8mm allen bolt that holds a metal coolant line to the side of the engine block. I found it easier to remove this bolt to take out the factory TIP and install the new one.
![Image]()
Now this is one vacuum line on the bottom of the TIP (under vehicle) that needs removed.
![Image]()
![Image]()
![Image]()
![Image]()
Now with all of the lines removed from the TIP, there is an axle shield that needs removed for easy access to the bottom of the TIP its held in place with (2) 16mm bolts. With that removed, you can see the 5mm allen bolt the holds the bottom of the TIP into the compressor side of the turbo. After that is removed, a flat head screwdriver will work to pry the TIP off, not alot of force needed. Or you can work it back and forth til it pops off.
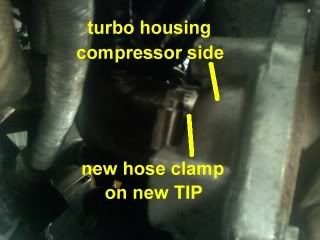
Go back to the top of the vehicle and remove the stock TIP carefully so you dont rip any factory hoses. To help with the installation of the new TIP, i sprayed some WD-40 on to a rag and wiped the inside and outside of the inlets of the new TIP or dishwashing soap will work as well. Now here's the fun part of the install, aftermarket TIP have a much wider bottom and it's a really tight fit to put it into place on the compressor housing. This part may take alot of time and patience just a warning. Now DO NOT forget to put a new hose clamp on to the new TIP before its properly placed. I just slipped the hose clamp onto the new TIP then put the TIP on to the turbo compressor housing. This part takes some time and patience, but it will fit lol. The same thing goes for all the hose clamps.
![Image]()
I installed all of the vacuum lines, DV, and PCV check valve into the new TIP before tightening the hose clamps. *NOTE* i DID NOT reinstall the factory allen bolt that holds the solid coolant line onto the engine block. Space was really tight, so i decided to let it out, so i didnt damage the new TIP (this is optional either way, after the new TIP is in the line isnt moving lol). With everything in its correct place and proper fit, you can tighten all hose clamps. Now you can reinstall the axle shield into place.
![Image]()
![Image]()
Going back underneath the hood, i reinstalled the battery tray. Then the battery and housing pieces as well. Then i reinstalled the MAF housing back into new TIP and bolted my SRI back into place. Tighten the hose clamps on BOTH sides of the MAF housing. Put the air filter back on. Double check on ALL hose clamps, so you can avoid leaks. Now with the battery back into place and hooked up, i choose to start the car. Listen for leaks/hissing. If you have an aftermarket boost/vacuum gauge, you can easily tell if you have no leaks.
I noticed alot nicer power at higher rpm's and a louder phsss sound too. It looks harder then it actually is. Just take your time, the vacuum lines, pcv check valve, and diverter valve will really on fit on one place, really hard to put them in the wrong place lol. If your have any problems or questions feel free to PM me, id be glad to help") .
.
here's a quick side by side pic

Here's list of tools needed:
* Floor Jack and Jack stands
* Sometime to put behind the rear wheel so the vehicle will not move
* Safety googles are highly recommended
* Flat Head screwdriver (long and short length)
* Phillips screwdriver (long and short length)
* 8mm allen wrench
* 5mm allen wrench
* pliers
* 3/8 and 1/4 drive ratchets with extensions
* 10mm socket
* 13mm socket
* 16mm socket
* WD-40 or dishwashing soap
* Hose clamps
* Proper work lighting
First i would start with removing the engine cover. Then unhook your battery terminal, just unhook both because the battery will have to completely come out for easy installation. Then you'll need to remove the surrounding plastic pieces around the battery. Before you can remove the battery, there's a small metal bracket held in place with a 13mm bolt, in between the battery and headlight housing. Here's a pic of what it should look like afterwards.
Here's a pic of the (4) 10mm bolts holding the battery tray in place, these need to be removed for the tray to come out.
After the battery and it's housing are removed, begin to remove the stock air filter and the MAF housing. Now i have a SRI, so I just had to remove my hose clamp to take the air filter off. If you have the factory airbox, youll need to remove that. Next I removed the actual MAF sensor. You need to unhook the sensor out of the housing first tho.
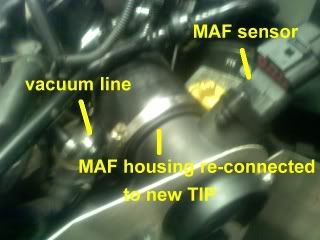
**This is a pic with the new TIP installed on to the MAF housing
Then i removed the nuts holding my SRI heatshield into place. Now I just removed the hose clamp on the other side of the MAF housing, so when i removed the SRI heatshield the MAF housing could stay into it. *Note i have my plastic screens removed from my MAF housing. You should have a honeycomb like plastic on both sides of your MAF housing.
Now with the all of that outta the way u can begin to remove the vacuum lines and other things off of the factory TIP.
First the factory clamps used are a 1-Time use clamp, best to go buy need hose clamps from an autoparts store or whatever. I used a flathead screwdriver and pliers to remove the factory clamps. You'll need atleast (5) hose clamps in different sizes, i just took the new TIP to the hardware store and matched it with the right sizes.
The first vacuum line i removed is the smaller one. Then i removed the factory DV from the top of the TIP. Behind that is the PCV check valve or hockey puck, remove that. The last line to remove on the top of the stock TIP is the N75 valve.
There is a 8mm allen bolt that holds a metal coolant line to the side of the engine block. I found it easier to remove this bolt to take out the factory TIP and install the new one.

Now this is one vacuum line on the bottom of the TIP (under vehicle) that needs removed.
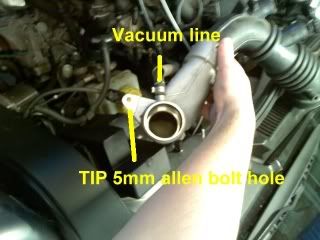

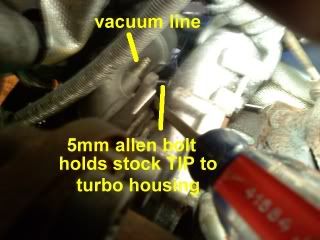
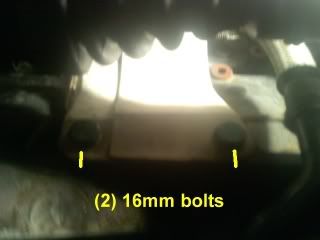
Now with all of the lines removed from the TIP, there is an axle shield that needs removed for easy access to the bottom of the TIP its held in place with (2) 16mm bolts. With that removed, you can see the 5mm allen bolt the holds the bottom of the TIP into the compressor side of the turbo. After that is removed, a flat head screwdriver will work to pry the TIP off, not alot of force needed. Or you can work it back and forth til it pops off.
Go back to the top of the vehicle and remove the stock TIP carefully so you dont rip any factory hoses. To help with the installation of the new TIP, i sprayed some WD-40 on to a rag and wiped the inside and outside of the inlets of the new TIP or dishwashing soap will work as well. Now here's the fun part of the install, aftermarket TIP have a much wider bottom and it's a really tight fit to put it into place on the compressor housing. This part may take alot of time and patience just a warning. Now DO NOT forget to put a new hose clamp on to the new TIP before its properly placed. I just slipped the hose clamp onto the new TIP then put the TIP on to the turbo compressor housing. This part takes some time and patience, but it will fit lol. The same thing goes for all the hose clamps.
I installed all of the vacuum lines, DV, and PCV check valve into the new TIP before tightening the hose clamps. *NOTE* i DID NOT reinstall the factory allen bolt that holds the solid coolant line onto the engine block. Space was really tight, so i decided to let it out, so i didnt damage the new TIP (this is optional either way, after the new TIP is in the line isnt moving lol). With everything in its correct place and proper fit, you can tighten all hose clamps. Now you can reinstall the axle shield into place.

Going back underneath the hood, i reinstalled the battery tray. Then the battery and housing pieces as well. Then i reinstalled the MAF housing back into new TIP and bolted my SRI back into place. Tighten the hose clamps on BOTH sides of the MAF housing. Put the air filter back on. Double check on ALL hose clamps, so you can avoid leaks. Now with the battery back into place and hooked up, i choose to start the car. Listen for leaks/hissing. If you have an aftermarket boost/vacuum gauge, you can easily tell if you have no leaks.
I noticed alot nicer power at higher rpm's and a louder phsss sound too. It looks harder then it actually is. Just take your time, the vacuum lines, pcv check valve, and diverter valve will really on fit on one place, really hard to put them in the wrong place lol. If your have any problems or questions feel free to PM me, id be glad to help
.

